
How to Turn A Slimline Pen. Part 2.
Site InformationArticle Search
Sharpen Your Router Bits
Review: Mini Siliconc Glue Brush Tips For Purchasiong A Cordless Drill Five Tools You Can't Live Without Hastings Woodworkers Guild How To Turn A Slimline Pen Part 1 Product SearchSatisfaction Guarantee
Please refer to the individual product merchant for information on their Policies for returns .
  Turning a pen can be fun and is most certainly rewarding. It's not hard once you get the hang of it either. Everything you need to complete the job is commercially available either, locally or via the internet at a reasonable cost. The instructions for preparing and turning the pen blanks are similar, however some are put together differently. Instructions are available on the internet at www.timberbits.com |
IntroductionTurning a pen can be fun and is most certainly rewarding. It's not hard once you get the hang of it either. Everything you need to complete the job is commercially available either, locally or via the internet at a reasonable cost. The instructions for preparing and turning the pen blanks are similar, however some are put together differently. Instructions are available on the internet at www.timberbits.com
Rough Turning The Pen Blank

A gouge is then used to turn the blanks down. The best method is to turn from the outside of the blank into the centre. This method ensures less chance of tear out. It is also good practice to leave around half a mm on the diameter of the blank at the end. This gives you the opportunity to sand the blank as thoroughly as is required without making the blank undersize. You can also measure the blank with digital calipers to achieve the same goal.
Sanding The Blanks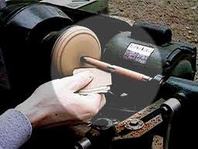
The next step is sanding using paper grades from about 80 grit through to about 400 grit. When you reach 240 grit paper stop the lathe and sand along the grain of the timber to remove any small sanding marks left by previous grades then continue sanding through each grade using the same method. This will ensure that your finish is of the highest grade before applying your finish. A little extra effort and attention to detail at this stage will be worth it in the long run.
Finishing the BlanksI have tried several finishes including shell-a-wax and shellac but have settled on a CA (Cyanoacrylate) finish. This is the best way to finish your pens in my opinion as the oil in your skin does not affect the finish leaving a lasting shine on the pen.
The best way to apply the CA is with paper towelling folded and then cut into small sections. This will be demonstrated in a video You then reduce the speed of the lathe to around or close to about 800rpm. Any faster and the superglue flicks of the pen and does not coat properly. Hold the paper under the pen from the opposite side to where your standing and apply three drops of glue to the longer section of the blank and two to the shorter section moving the paper to spread the glue as it is applied. It is best to use the thicker super glue at this point as it gives you a bit more time to work with the glue before it dries. Not much pressure is required to spread the glue and one thing to definitely watch out for during this step is the heat caused by friction; it does tend to get warm! Between each coat an accelerator such as Mitre Fix is sprayed onto the blank in a few short bursts. This accelerator dries the glue to facilitate the next coat being applied. Glen 20 achieves the same effect and is cheaper to buy and the can twice as big as the Mitre Fix so lasts a lot longer. This will save you money in the long run. Apply between 10-20 coats depending on your personal preference for a good basis for a great finish. This method was developed by and is used extensively by David from Timberbits.com Once the appropriate amount of coats have been applied the pen will need to be buffed. I use Micro mesh for this stage of the pen making. Final Finishing and Buffing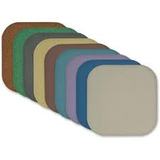
The lathe is turned back up to around 3000-4000 rpm depending on the lathe your using. The micro mesh is saturated with water using a bucket or spray. Then starting with the coarsest grade of mesh, polish along the length of the pen until you get a smooth finish. This process is repeated several times using each of the pads from fine to finest, wetting in between.
In the video below David uses Brasso for one final pass after the micro mesh, before using car wax for the final buff. However this is a matter of personal preference. So far I just use the buffing compound that comes with the micro mesh kit and achieve good results. You tend to spread glue over the bushes while applying it to everything else, so before you take the pen of the mandrel, it is necessary to score the blank at the bushes. By doing so it makes it easier to get each part of the pen away from the mandrel without chipping the finish. As you will see in the video you are left with a slightly jaggered edge, Applying very little pressure, rub both ends of each part on sand paper. This will give a perfect finish. The parts are now ready to be assembled. Assembly Of The Parts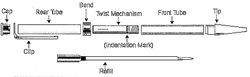
The final step of making a pen is the assembly process. Since timber swells and contracts with moisture content in the air it has been found that using a two-part epoxy such as araldite can be used to insure that the pen pieces stay solidly together. It is not absolutely necessary to do this, however your pens will come back to you to be fixed if you do not take this step.
When it comes to assembling the parts, I lay the pieces out on bench with the barrels of the pen in alignment and the pieces in the proper order. I mix a small amount of 2 part epoxy ready for the glue up. I always start with the bottom half of the pen. The nib assembly and the end cap goes on first. You can either use a homemade or commercially made press to press the parts together. Once pressed together, I then unscrew the nib assembly and insert the roller ball refill. Once pressed together I then move onto the cap half. I start with the clip and press that on. Once that has been pressed in, the last piece is the centre band coupler piece. I screw the centre band coupler onto the writing half then align the barrels. When the grains are matched up, I then push the barrel on by hand to get the press started. Before pressing the two halves together I apply just a dob of araldite to the twist mechanism and then finish the press on the bench vice. The video gives a visual reference to the steps taken to assemble the pen. Once this is all done, you have finally completed the pen! Visit "How To Turn A slimline Pen. Part 1" for more information. |
